Monday, July 20, 2015

Chicken Posole (30 minute recipe)


I know it's summer and most people don't like eating soup in the summer, BUT this has been sounding so delicious to me! I've always been a fan of posole and this recipe definitely reminded me of my grandmother's recipe; however, this is a super quick recipe!

Ingredients:

  • 1-2 pounds cooked chicken (I always shred a rotisserie chicken)
  • 8 cups of chicken broth
  • 1 bay leaf
  • 1/2 teaspoon thyme
  • 1/2 teaspoon oregano
  • 2 cloves of garlic, minced
  • 2 teaspoons of cumin
  • 2 teaspoons of salt
  • 1 teaspoon chili powder
  • 1/2 teaspoon coriander
  • 29 ounce can of white hominy (drained and rinsed)
  • 1/4 teaspoon red pepper flakes (optional)
Directions:
  1. In a large saucepan, bring the broth to a boil on medium-high heat. 
  2. Once simmering, reduce the heat to low and add all the ingredients to the pan. 
  3. Stir the mixture and keep on low heat until the soup is completely hot. (Remove the bay leaf before eating.)
  4. Garnish the soup with avocado, lime, cabbage, cilantro, and/or cottage cheese.
  5. Enjoy!

This is a super quick and easy recipe! It's loaded with flavor and just the right amount of spice! Serve it on the next cool day! :)

xoxo,
Jade

Friday, July 17, 2015

Quick Peach Cobbler

Y'all. I've always loved peaches, but throughout this summer, I have a newfound love for all things peachy. I've always been disgusted at the thought of eating cottage cheese with peaches, but let me tell you something. I tried it for the first time last month and have been addicted ever since. Who knew?! I don't know what it is, but I love it.

Anyways, I've had a lot of canned peaches in my pantry lately, so I decided to create a cobbler over the past weekend! We were having a garage sale and I wanted to make a fun, little dessert for my family and our neighbors (who let us borrow their table). It was delicious! There weren't any leftovers! Eat it warm with a big scoop of vanilla ice cream and you are set!

Ingredients:

  • 1 cup sugar
  • 1 cup flour
  • 1 teaspoon baking powder
  • 1 cup milk
  • 4 Tablespoons of butter
  • 1 large can of peaches with juice

Directions:

  1. Preheat oven to 350 degrees. Grease a 9x9 dish. Set aside.
  2. Mix sugar, flour, and baking soda in a large mixing bowl.
  3. Stir in milk and cubed butter to make batter. 
  4. Pour batter into the baking dish. 
  5. Add the peaches and juice on top. 
  6. Place in oven and bake uncovered for 45-50 minutes.
  7. Enjoy!

xoxo,
Jade

Wednesday, July 15, 2015

mac & cheese


I've always loved pasta & I absolutely love macaroni and cheese. I don't care how it's made, I love it. After years of making macaroni and cheese from scratch, I think I've found my favorite recipe. It's super creamy, full of cheesy goodness, and full of flavor. It would be great to serve with grilled chicken and veggies or even as a dish for a party!

Ingredients:

  • 12 oz. dry pasta (I used Ronzoni gluten free pasta)
  • 1 1/4 cup milk 
  • 2 Tbsp. butter
  • 8 oz. velveeta cheese, cubed
  • 1 cup shredded cheese, any kind (sharp cheddar or a mixture of cheddars)
  • a dash of Lawrys seasoning salt
  • a dash of pepper


Directions:
  1. Boil pasta following the directions on the box, cooking until al dente. 
  2. Drain pasta, let it cool under cold water, and set aside.
  3. On low-medium heat, add the milk and butter to a large saucepan. 
  4. Slowly add the cubed velveeta and the shredded cheese to the pan. 
  5. Once the cheese has completely melted, add a couple dashes of Lawrys (or regular salt) and pepper to the mixture. 
  6. Add the pasta and let it warm up, stirring completely.
  7. Serve the macaroni and cheese alone or aside meat and veggies.
  8. Enjoy!


xoxo,
Jade 

Monday, July 13, 2015

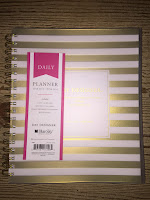
it's all about the planner


If you know me at all or have been following me on the blogging adventure, you will know that I am OBSESSED with planners. Last summer, I purchased four planners (in an attempt to find the perfect one). After spending so much money on planners, I sold the ones that didn't work for me and used the Lilly Pulitzer planner. When summer rolled around, I didn't want to spend more money purchasing a million planners in search of 'the one'. After searching the internet, trying out some free planner pages, and checking out all my friend's planners, I decided to go with a planner that is nothing like any of the planners I researched.

I've always been a fan of The Day Designer, but never wanted to pay the price ($58). Well, Day Designer collaborated with BlueSky and created some very inexpensive & amazing planners! I've literally fallen in love with my planner and only paid around $20!

Y'all, this thing is gorgeous. They have so many to pick from; however, I chose the Daily version! You can check them out at your local Target. Pick one up before they're gone! :)


I also picked up the large desk calendar and I am hanging it on my wall! It will include all the big dates/events.


 I love how clean and simple the inside of the planner is. The full page, daily layout will be perfect for the school year. Between work, school, four organizations, family things, personal events, and working in the schools, I will need all the space I can get to keep my days organized.


If your looking for a new planner, check these ones out! The prices range from around $8-$21, which is such a great deal! I'm pretty hard on my planners, so it'll be interesting to see if this lasts a full school year. :)

What brand planners do you use?


Have a great week!
xoxo,
Jade

Friday, July 10, 2015

Spinach and Feta Burgers

It's summertime and you know what reminds me of summer? BURGERS. I love them. As I was looking in the fridge, I noticed that we had spinach, onions, feta cheese, and ground chicken. So of course, I had an idea. I concocted this recipe and there were absolutely no leftovers! (It was great because even my little brother ate them, it was bad because I was wanting to eat them for lunch the next day!) It would go great on a bun; however, we ate it with just a side of cabbage! The recipe makes 4-6 patties!


 Ingredients:
  • 1 pound of ground meat (we used chicken, but it would be great with beef or turkey)
  • 1 egg
  • 3 oz. of feta cheese crumbles
  • 1 box frozen spinach, thawed & drained well (you may need to get excess moisture out with a paper towel)
  • 1/2 onion finely chopped
  • 2 cloves of crushed garlic
  • salt & pepper (optional)

Directions:
  1. In a large bowl, add the meat and egg. Start mixing it together with your hands. 
  2. Add the feta, drained spinach, onion, garlic, and salt/pepper. 
  3. Mix together!
  4. Grill or cook on the stove until the meat is done. 
  5. Serve on a bun or with a side of veggies!
  6. Enjoy!
xoxo,
Jade


Wednesday, July 8, 2015

Selling your course books

With school starting in August, it's time to make room for next semester's books (if you haven't done so already)!

The week that school ends, I typically sell back some of my textbooks. I only keep the one's that I can use for future reference or the one's that professors say to keep for future use.

Because textbooks are so expensive, I always search for the best deals. There are a few places that I typically use to sell my books. I compare the prices and sell to the competitor that gives me the most for my money. This takes work. This takes time. This usually means that I am selling books to all different places. I never pay for the shipping. I always get at least half of my money back. :)

  1. Amazon.com: This is an easy way to sell your books. You just type your ISBN number into the search bar and when your book pops up, you usually have two choices. There is a 'trade-in' button and often times a 'sell this book' option. With the trade-in, Amazon will put a gift card on your account once they have received the book. You can use that gift card to buy your future books. When you sell your book, you set up a seller account and can create a price for your textbook. It's a little bit more work, but you often make more money doing it this way.
  2. Chegg.com: This is another easy way to sell your books. You create an account and then type your ISBN number into the search bar. You can sell your book to Chegg and then you have a few choices to pick from. You can 1) have the money put onto your Chegg account for later use or 2) have them send you a visa card with the money on it or 3) have them send you a check with the money on it.
  3. Your campus' Barnes & Noble: This rarely works for me. I usually find that the bookstore doesn't want to give me as much as I could sell it for on other sites. It might work for you, so check it out!
  4. Textbook Solutions: We have a Textbook Solutions store in College Station, but I always go onto their website and enter the ISBN numbers into their search bars to get a quote for the books I am wanting to sell. It's so easy to sell to them. You just take your book to their store and they'll give you the money for it.
  5. ebay.com: I don't use ebay to sell textbooks that much; however, I used it a lot more when I was taking college courses in high school. You can definitely make some money off of this site as well!
  6. Sell to your friends: I've done this before as well. I like to sell my textbooks to my friends because I like knowing who it's going to. (I know that's weird.) When I sell to my friends, I can give them my thoughts on the course, the professor, and they have someone they can talk to when they have a question about the course or a specific assignment. I love helping other people out, so when I sell a book to a friend, I usually always include all of my course notes and other materials that may be beneficial to them. 

If I'm honest here, I'll admit that buying textbooks is exciting for me. I love purchasing products for school. Now I really sound crazy. Last summer, I purchased over 10,000 post-it notes. (don't ask me why, I got them for a really good deal.) I only paid $35 for them! If I had room, I would have a closet full of school supplies. I get this from my mom. She always has a dresser drawer full of school supplies, and we buy the stuff for cheap! 

Anyways, I'm done making myself sound crazy. But, if you see me in the office stores in July/August, I'll be shopping for the penny, nickel, and dime school supplies items. ;) Last year, I purchased a $60 backpack (brand new) for only one cent. 

Please tell me I'm not the only school supply crazy person out there. Maybe this is why I'm going to school to be a teacher. :) 

xoxo,
Jade

Monday, July 6, 2015

Spaghetti Sauce with Viviana's Tomato Basil Fettuccine Noodles

 I love pasta and I love spaghetti sauce; however, I usually only like my mom's spaghetti recipe. It's not too sweet, its full of flavor, and it always tastes great! The secret is to look for a spaghetti sauce with low sugar and simmer the sauce for at least three hours. (Sometimes we sneak into the sauce and eat it as soon as it starts boiling. It's still delicious, but the longer it cooks, the better it tastes.) This recipe makes a lot! We always have left overs, but you can always half the recipe or freeze the sauce for future use.

Ingredients:
  • 2 tablespoons olive oil
  • 1-2 medium onions, chopped
  • 1 teaspoon crushed garlic
  • 1/2 green bell pepper, chopped
  • 2 pounds of ground beef
  • 1 large can of crushed tomatoes
  • 2 cans of tomato sauce or spaghetti sauce (buy the sauce with the lowest amount of sugar, like 4-6 grams)
  • 1/2 cup of Pace Picante sauce
  • few drops of Worcestershire sauce
  • 2 teaspoons of dried basil
  • crushed red pizza peppers, to taste (optional)
  • fresh pepper, to taste
Directions:
  1. In a large pan, saute the onions, garlic, and bell pepper in oil. Add the meat and cook until both the meat and onions are completely cooked. 
  2. Add the remaining ingredients.
  3. Bring to a boil.
  4. Simmer on low heat for 3-4 hours, stirring occasionally.
  5. Taste test and add/change seasonings, if needed.
  6. Serve over spaghetti noodles.
  7. Enjoy!


I found these noodles at my local TJ Maxx. I love the Viviana Brand and these tomato basil noodles were full of flavor!

xoxo,
Jade

Thursday, July 2, 2015

Cajeta/Mexican Caramel

For as long as I can remember, my family has made this caramel for us, and it is so freaking delicious! It is the easiest recipe ever, and it only calls for one ingredient! It doesn't last long in our house! 
Ingredient:
  • Eagle Brand Sweetened Condensed Milk
Directions:
  1. Grab your largest pot & fill it 3/4 full of water.
  2. Tear off the paper on the can of sweetened condensed milk.
  3. Place the can into the pot of water. Make sure it is completely submerged! You can lay it on its side if you want. (It will explode if it isn't fully submerged in water the whole time!)
  4. Turn the burner on medium-high heat and cook for two hours. 
  5. Every thirty minutes to an hour, check to make sure there is enough water. Add water if needed. 
  6. After two hours, turn the heat off. Drain the water and leave the can in the pot to cool.
  7. Once it is completely cooled, serve it on toast or with fruit or by the spoonful.
  8. Keep the cajeta/caramel refrigerated.
  9. Enjoy!


xoxo,
Jade

Wednesday, July 1, 2015

July Goals

I love making goals and being able to mark through them. I always have things going on in my brain, so it's easier for me to write it down and physically see it. This allows me to be more accountable, and pushes me to accomplish the goals that have been set.

  1. Read at least three books: I've started reading a lot more lately, but I didn't do very well with reading books in June. I have a list of books that I want to read before school starts back up, so I really want to read at least three books this month.
  2. Work out twenty times this month: This is a big one for me. I want to start working out more, and I will do that by following the T25 workouts.
  3. Find and purchase this years school planner: another hard one for me. I'm addicted to planner shopping. Last summer, I purchased FOUR planners before the semester started. Needless to say, I didn't love any of them. I know, I have a problem. I'm on the look out and have been doing my research. I'm thinking about purchasing the Day Designer for Blue Sky daily edition once it comes to Target. It's inexpensive and gives me a taste of what the real Day Designer is like.
  4. Save money: With a busy semester coming up, I need to save as much money as possible so I don't have to be stressed about working or not having money during the semester.
  5. Get an early start each day: This upcoming semester, I have 8am's twice a week and then I will be working in the public schools twice a week. This means, I need to start getting up early and starting my day so that I'm not exhausted when school starts.
  6. Post more: I've been really working on planning out my posts and scheduling them so that I don't go days/weeks without a post. I have so many posts planned and I want to stay ahead on the blog!
Do you have goals you set each month? Check back on the last day of July and see if I accomplished these goals! 

xoxo,
Jade